Let’s explore some of the common features that can be set up on the iPad to improve accessibility for students with specific input, output or interaction needs.
Click here for a Printable One Page Resource Guide
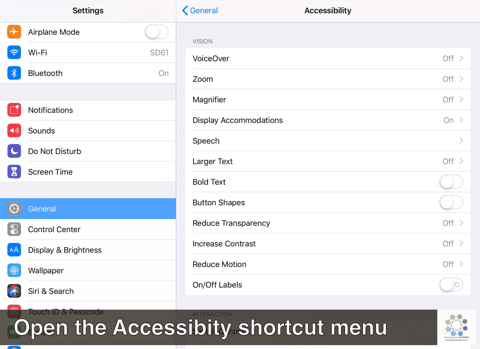
Open the Accessibility menu
 The Accessibility menu has many features that can be enabled to support users who prefer or require a different interface style on the iPad.
Launch the Accessibility menu by tapping on the Settings app icon and then choosing General –> Accessibility.
Accessibility Shortcut: Set up the triple-click shortcut
You can use a triple click on the home button to launch one (or more) of many different accessibility features. Note that if you decide to enable triple click for more than one shortcut, you will be prompted with a menu to choose the function you would like to enable. Below is a brief explanation of some of the more common accessibility features used by educators and students with iPads that can be reached using the triple click.
While it’s possible do enable more than one accessibility feature into the accessibility shortcut, this will create an extra step when the home button is triple-clicked because the user will need to then choose the feature they want to use.
Dictation (Speech to Text)
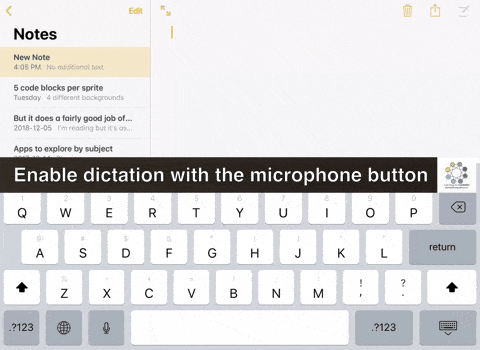
Once enabled, the dictation option will appear as a microphone icon on the iPad keyboard.
You can use dictation instead of your keyboard to enter text with many apps and features that use the iOS keyboard. When using an iPad with the latest version of iOS installed, you do not need to be connected to the internet for dictation to work.
Dictation can also be set up to transcribe words from different language and can be used easily in a French Immersion setting. (Not all languages are supported for offline use at this time.)
Punctuation also works! You can add punctuation by simply saying what you want. For example, “I’m sorry comma Dave period I’m afraid I can’t do that period” becomes “I’m sorry, Dave. I’m afraid I can’t do that.”
Speak (Text to Speech)

Once enabled, the “Speak” option will appear in a context menu if text is selected on the screen.
From the Accessibility menu, you can enable text-to-speech function for selected text by choosing “Speech” from the menue and then toggling the “Speak Selection” option.
In order to use the Speak Selection feature, highlight text on the screen and choose “Speak” from the context menu that appears.
You can also enable the “Speak Screen” option within the Settings menu so that the user can have the entire screen read to them as needed.
AssistiveTouch
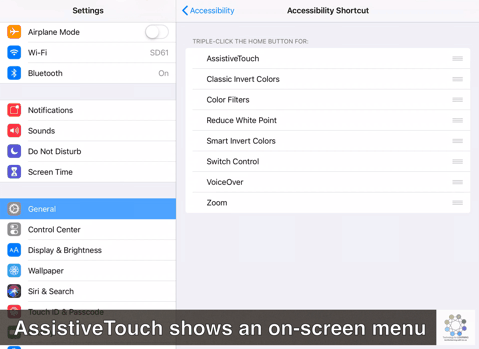
While the swiping and tapping gestures are often what makes the iPad so easy to use for students, some users — particularly those with challenges around their fine motor skills — may prefer to use the Assistive Touch feature when it comes to accessing Notifications, Control Center, the Home screen or even when using device-level functionality such as volume level or screen rotation. Assistive Touch will also appear when the iPad is locked after it is enabled.
Users can also customize the top-level menu to suit their preferences as needed.
Invert Colours
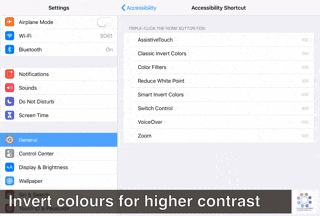 You can set up a shortcut on the iPad to invert the colours using a triple-click sequence on the home button. In order to set up the triple-click accessibility shortcut for inverted colours.
Additionally, you can choose between two modes of colour inversion: “Classic Invert Colors” will completely reverse all of the colours on the iPad, whereas “Smart Invert Colors” will retain the original colouring of the icons and apps on the screen while switching the predominately white areas to black and black writing to white.