Let’s look at the different ways you can customize the Chromebook environment experience for users with specific needs around accessibility. You can also see a video that explains the accessibility options at the bottom of this page.
Note: As ChromeOS is updated, the layout of the below menus is subject to change in appearance, but the functionality and access to accessibility features should remain the same.
Click here for a Printable One Page Guide on Accessibility using Chromebooks
Enabling the Accessibility setting in the menu for easy access.
Click the status area, where your account picture appears, choose Settings and then make sure to Show Advanced Settings at the bottom of the page. This will reveal the accessibility section.
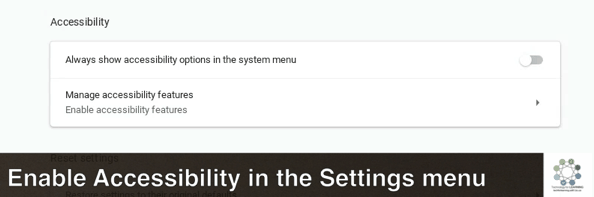 There is an option in the Chrome settings to display the accessibility option in the main system for easy access. We recommend enabling this setting for easy access to all of the different accessibility features so that they can be turned on or off with a toggle switch. See the next graphic below.
Once you have enabled Accessibility through the system settings in ChromeOS, you can see the list of all of the different settings available to the user at the system level.
Most of these settings take effect immediately after being turned on and can be switched off in the same way. Note that some of these may drastically change the appearance of your Chromebook environment. Be prepared to switch the features off from the same menu before navigating away in case you want to change it back.
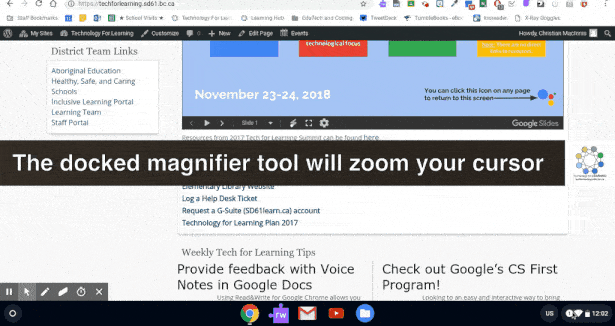
Animated demonstrations of some of the features appear in the graphics below, including high-contrast mode, on-screen keyboard and docked magnifier.
For more information on accessibility on the Chromebook, please visit the Google support page for Chromebooks.
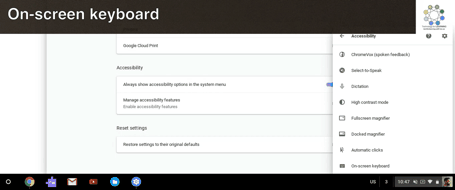
If you have difficulty using the Chromebook’s physical keyboard, you can input text with the ChromeOS on-screen keyboard.