

The CSL & Student Digital Portfolio App is a digital service developed by the Greater Victoria School District to facilitate assessment for K-8 students. It showcases student work visually on a secure platform that is accessible to teachers, parents and students. Privacy is a foundational component of the tool—it is only accessible through the Parent Connect and Student Connect apps. K-8 students will use Student Connect for digital portfolios; 9-12 students will use Student Connect for digital tool consent, as they have in previous school years.
Student Digital Portfolio is built with BC’s curriculum at the forefront, and is meant to be used as a digital assessment tool that allows teachers to communicate student learning aligned with the Greater Victoria School District Assessment Principles. CSL can be used for informal (digital portfolio) and formal (report card) reporting where the primary focus of assessment is the curricular competencies and content.
Initial Teacher Setup
CSL can be used for either report cards or digital portfolios or both report cards and digital portfolios. Each class requires a template to be set up prior to use of the digital portfolio application. If you are using CSL to create report cards you will need to create a class template for each new term. However, if you are not creating report cards (i.e. you are only using the Student Digital Portfolio) the template you create is valid for the whole school year. A template is built by entering the class, division, and term. If you have a combined/split class, you will need a separate template for each grade level. However, the portfolio application will allow you to post activities to both classes simultaneously. Please review the appropriate instructions:
Ownership of the Class Template
The enrolling teacher is the person who must create a template for their division, they are also the owner of these templates. Non-enrolling teachers can also create templates for the students/divisions they teach. Enrolling teachers can add other school staff (co-teachers, EA’s, etc.) to their class template via the Staff Access tab (see below). Should the enrolling teacher leave their current assignment for any length of time their administrator (P/VP) can transfer ownership of their class template to their replacement. Administrators can review the instructions for this by following these links:
The Digital Portfolios Home Page
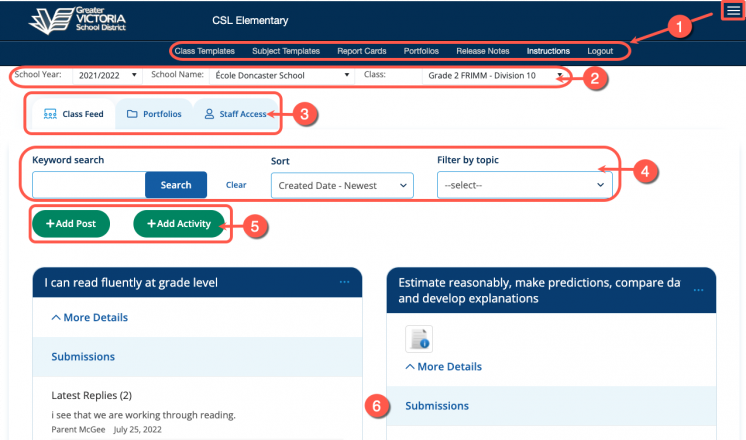
- The Menu: Click the Menu Icon at the top right of the screen to view instructions, create and manage your class templates, and more.
- Class View: Use the drop-down selectors directly below the page header to specify the school year, school and class. Typically it will default to your current assignment, but you may need to toggle the class section if your are teaching a combined/split class. Administrators may use this section to review multiple divisions within their school
- The Top Tabs: Click on a tab to access:
- Class Feed: A gallery of your current posts and activities (which can be searched and sorted as described below)
- Portfolios: A list of your students with links to their individual portfolios
- Staff Access: Grant access to your class template to other staff members at your school
- Searching and Sorting: Find current and previous assessment activities based on the criteria you enter. For example, you can filter Math assessments for Term 1 and sort them from newest to oldest. Teachers can create new filters (called Topics) when they create an Activity within the portfolio. Custom topics will be available to use again in future sessions.
- Adding Content: Posts are announcements to the class and/or parents. This feature was added to assist teachers transitioning from other digital portfolio platforms that contained this feature. Activities are focused on assessment and communicating student learning. Activities are where you teachers can add artifacts and provide assessment of student learning, as well as engage in conversation with parents and students about their learning
- Gallery: By default this section displays the most recently added posts or activities. You can filter and sort the content as described in number 4 above.
Creating Assessments
Assessments are called Activities in the App. Click the +Add Activity button to create a new one. A new pane will open in front of the current browser tab.
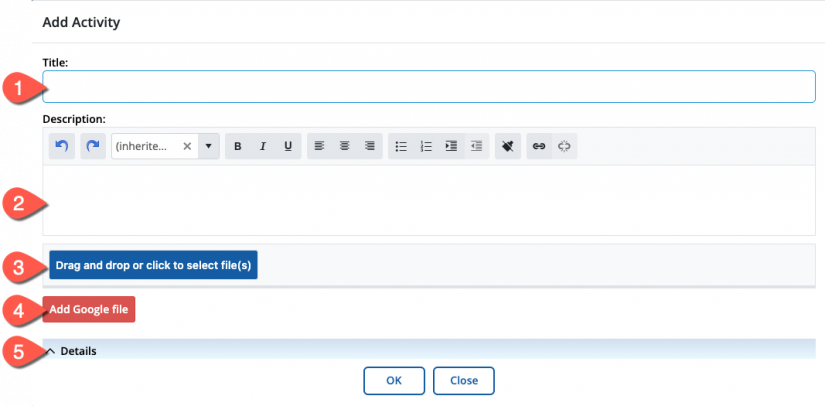
- Title: Including the competencies addressed in the activity as part of the title is a good way to immediately communicate the intent of the assessment. You can start your title with the words “I can…”
- Description: The description field can be used to describe the activity or attach a rubric, either as a table copied directly from Word/Google Docs, as a link to a Google Docs file, or as an image (screenshot, scan or photo). You might also include details about the content of the lesson to give parents a sense of the context. You can also include links and/or paste formatted text created in another application (like Word or Google Docs) directly into the box
- Local Upload: Files created on your computer (ex. Microsoft Office docs, images in your Downloads folder etc.) can be added using this button
- Google Upload: Items stored in Google Drive can be added using this button. Students are also able to load Google files if they have been tasked with responding to the activity/assessment in the Activity creation window
- Details: Click anywhere on the blue Details bar to open a sub-page where you can specify the assessment types, curricular outcomes being targeted and to whom the assessment will be visible (see below)
Defining your Assessment
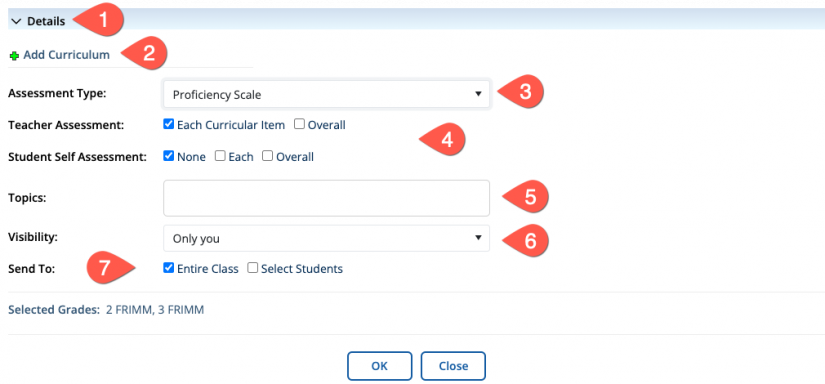
- Details: Click anywhere on the blue bar to expand the panel
- Add Curriculum: Click here to specify the curriculum being targeted by the assessment (detailed below). Note that Big Ideas are selectable but not items to be assessed. Curricular Competencies and content are the focus of assessment in the current Reporting Framework
- Assessment Type: Proficiency Scale aligns with the Ministry of Education’s future goals for reporting, but you may also select: None, Anecdotal or Complete/Not Complete
- Teacher and Student Assessment: Choose the level of detail you will assess. Teachers can assess each chosen curricular competency/content item, or provide an overall assessment. They can also ask students to provide a self-assessment for each curricular competency/content item selected by the teacher, an overall activity assessment, or no assessment
- Topics: Topics are essentially tags/filters that help you to search for and organize the assessments you create. A recommended strategy is to tag your assessments with the subject area and term when the assessment was created (ex. Math–Term 2)
- Visibility: Decide who can view the assessment. You may create an assessment in advance and then change the visibility when you are ready for students to complete it
- Send To: Assessments can be given to the entire class, or to individual students (ex. if you are differentiating instruction for example, you may create a separate assessment for a smaller group of students)
Adding Curriculum
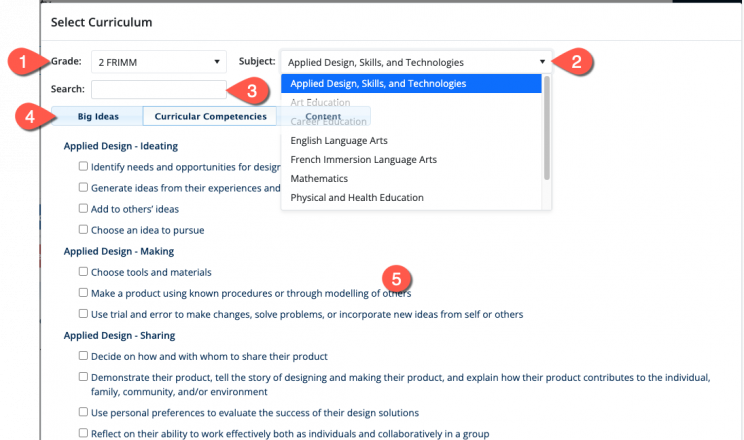
- Grade: Select the grade level if you are teaching a combined/split class
- Subject: Select the subject area. This will populate the Curricular Content for that subject and grade level
- Search: Use search to find specific competencies within the list
- Curriculum Tabs: Click the headings to choose items from Big Idea(s), Competencies and/or Content. Assessment is only possible when selecting Curricular Competencies and/or Content
- Curricular Content: Use the checkboxes to choose the curriculum you are assessing
Submissions, Assessments and Comments
Once an activity has been posted teachers and/or students can submit artifact(s) and an assessment of their work. A check mark indicates that the assessment has been completed, a clock icon beside an activity indicates that an assessment is has not yet been completed.
Submission
Teachers may choose to submit student artifacts and provide all assessment information using the Digital Portfolio app. Students are also to submit artifacts using school-owned or personal devices by logging into Student Connect with their district (SD61learn) Google accounts.

- Teachers will select the Portfolios tab. Students will see an activity in their feed with a “new” notification
- Teachers will select the student who they are preparing a submission for
- Teachers/Students will click the +Add Submission button to upload the artifact(s)
- Enter a description of the artifact/activity in the Description box
- Upload the artifact from your device using the blue button, or, click the red button to add the artifact from Google Drive
Assessment
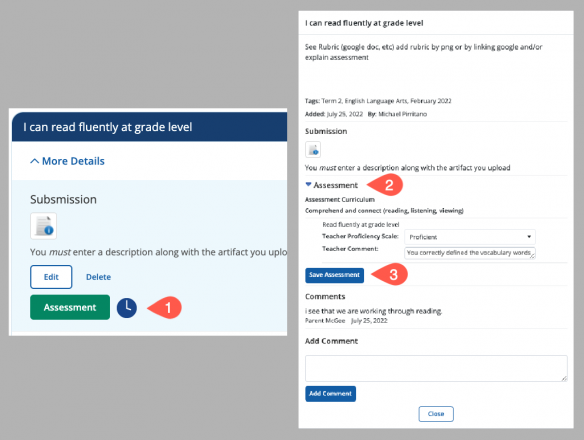 Teachers/Students will click the Assessment button to submit an assessment
- Teachers/Students will respond to the assessment prompts which match the curricular outcomes and assessment type entered by the teacher when creating the activity
- Save the assessment
Optional: Add a comment to the assessment. This comment will be seen by parents, students and teachers when they review the activity.
Comments/Replies
Students, Teachers and Parents can reply to a completed activity; the comments will only be visible to the student, parent(s) and teacher(s) who have access to view the child’s profile.
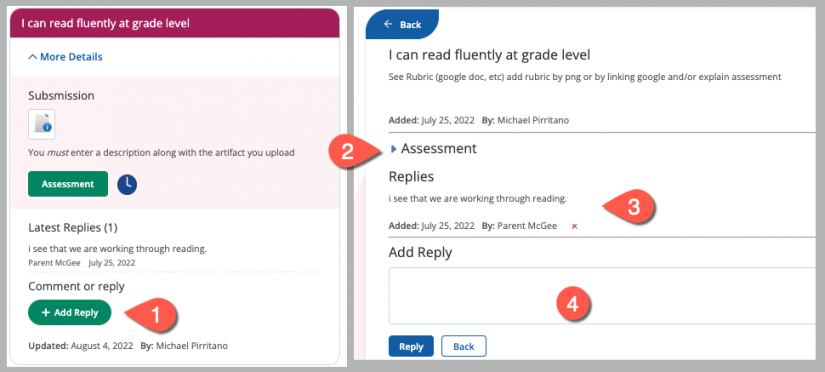
- Click the +Add Reply button.
- Parents and students can review the assessment by clicking the arrow beside the word Assessment
- Previous replies are listed directly above the Add Reply box.
- Click in the box and enter a reply. Only plain text can be used (i.e. no bolding, links, etc.). Click on Reply to send the comment.