
What is a TEC Package, I thought it was called an overhead projector?
TEC (Technology Enhanced Classroom) Packages are mounted projection units with audio systems and multiple inputs for connecting laptops, classroom desktops and mobile devices. There are several different configurations, depending on when and where the units were installed. Overhead projectors are those old things that you needed transparancies and non-permanent pens for. There may still be one or two in your building have been hoarded by an Art teacher. This guide will give general information about TEC packages, and aims to be applicable to many situations; however the GVSD Helpdesk can also be consulted to answer immediate issues with the TEC Package.
Jump to Hot Topics
 |  |  |  |
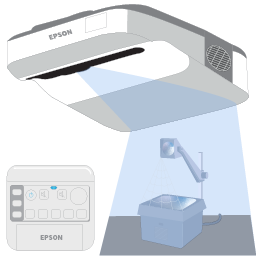
The Control Box
With a few exceptions, most of our TEC packages have a Control Box installed. Unlike the remote control unit the Control Box is not likely to get lost between the seat cushions, or under a stack of paper. Bonus: It also has big buttons and legible text. The diagram below outlines the function of each button (click on the image to see it enlarged).

The Remote Contol
The remote, should you happen to know where it is, offers the same great features of the Control Box but from farther away. It also offers the Freeze ability, which allows you to project a static static picture of the last thing you were showing while you set up the next thing you will present.
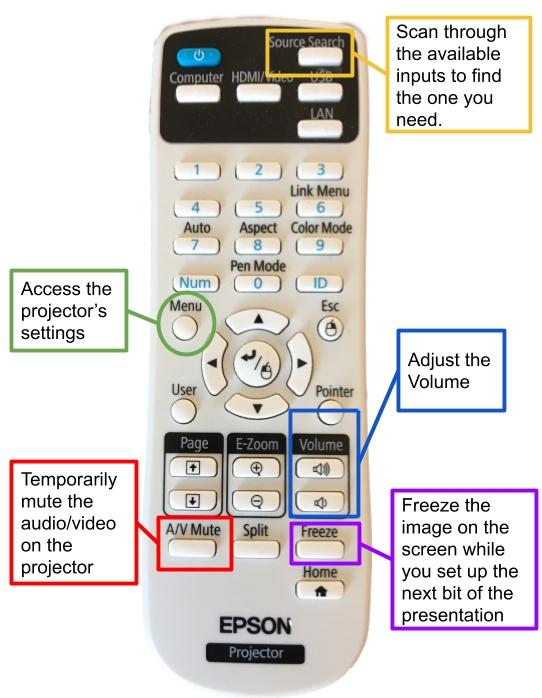
The Standard Remote for TEC Packages looks similar to this
Connecting Devices to the Projector
Just like a television, TEC packages have several ports for plugging in different devices. The devices that plug into a TV, ex. Playstation, DVD Player, Cable Box, etc. are called inputs or sources. TEC packages generally accept three different kinds of sources:
- VGA: This is the older standard for connecting a computer to a monitor. It does not transmit sound. If you have a desktop PC at the front of the classroom that runs a smartboard, etc. odds are it is connected with VGA and a separate cable for sound. VGA connections are viewed through the Computer 1 input.
- HDMI: This is a newer standard for connecting laptops, DVD players and other devices. Many TEC packages have an HDMI cable attached to the Control Box. This cable is connected to the HDMI 1 input.
- Wireless connections: The HDMI 2 input is connected to an Apple TV device which can be used to connect iPads/iPhones, Macs and district Windows computers with AirParrot software installed.
Wired Connections
Most classrooms should have a standard HDMI cable for connecting Educator Laptops, Chromebooks and other devices— like DVD players—directly to the TEC Package. Select HDMI 1 as the source and plug in the device. If you see a blank desktop when you plug in the device, refer to the Um, I connected my computer… where’s the picture? information below.
Chrombooks without HDMI outputs
Older Chromebooks have HDMI outputs for connecting to the TEC package, but the latest versions—currently being purchased by the district—do not. These computers use a newer technology called USB-C, which requires the purchase of an additional adapter to connect to existing HDMI cables, or a dedicated HDMI to USB-C cable. At present, the district does not have a large number of these adapters—however most schools should still have a supply of older Chromebooks with HDMI outputs.
HDMI Sound Configuration
When switching between wired and wireless connection you will likely have to select which output device you are trying to use. For HDMI connections ONLY!
- Click on the sound icon at the bottom right of the screen of the taskbar menu, so that you can select the audio device you desire.

- Expand the menu by clicking the ‘^’ option to see all audio options.

- Select the ‘Epson Speaker’ to choose the projector as your desired audio option.
- If you do not see you device or are experiencing other issues please restart your Apple TV and connected PC.
DO NOT reset your Apple TV.
Wireless Connections
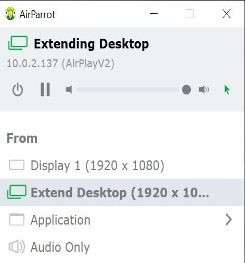
AirParrot

The AirParrot icon.

Click the image to enlarge.
All district laptops should have AirParrot installed; some desktop computers have it as well. If your laptop does not have AirParrot it can be installed from Software Center. AirParrot connects a Windows computer’s display wirelessly to Apple TV devices. In the past the app launched at startup, but that setting was changed so that users must launch the app by double clicking the icon on the desktop. In a perfect world you will see the name of your classroom listed among the available Apple TV’s in AirParrot’s window at the bottom of your screen ( see bubble A). You click the name of your room, enter the four digit code on your screen and magic happens. Or does it?
Air Parrot 3.1.7
The new version of Air Parrot allows you to extend your desktop display to the Apple TV as if you had two monitors attached. You can now show content on the tech package while you work on a separate task on your educator laptop.
Once you connect Air Parrot to your Apple TV, you can select the option to ‘Extend Desktop’ from the Air Parrot app on the PC. Once you are connected you can simply drag your content to the edge of the screen.
*Please Note
Any streaming of video content will display smoother with a direct HDMI connection.
Solving AirParrot Issues
 AirParrot can be a naughty bird sometimes. Here are the most common issues reported:
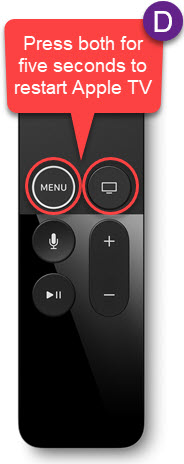
AirParrot does not list your room: AirParrot should list all the available Apple TV’s in your school, but sometimes you can’t find yours on the list. You might be able to just enter the Quick Connect Code to get immediate access. The quick code is the IP address of the Apple TV, and it is often listed on the Apple TV’s default screen (bubble B in the image above). If it is not listed try restarting AirParrot (C) and restarting the Apple TV (D). If you still cannot connect please request assistance via a Help Desk ticket.
AirParrot is connected, but there is no sound (or sound/images is very fuzzy): Restarting the Apple TV resolves this issue most of the time. Restarting is accomplished by pressing the Menu and Home (TV icon) buttons at the same time (D). Hold the buttons down for 5 seconds and watch the white LED on the front of the Apple TV box. When the white light begins to flash rapidly let go of the buttons. If the light does not start to flash, or if you get a message asking if you’d like to put Apple TV to sleep, let go of the buttons and press them down again for 5 seconds.
-
Connecting iPad/iPhone with AirPlay
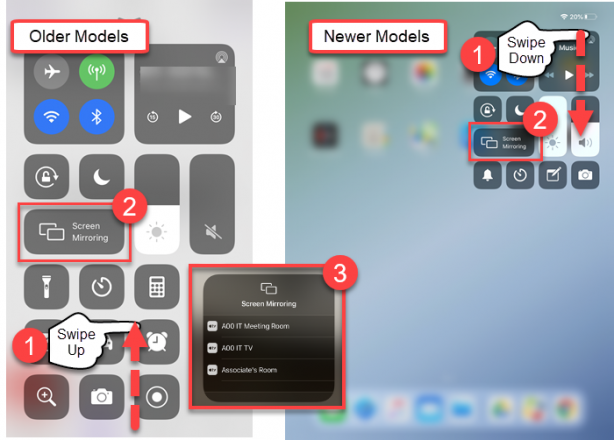
Apple devices connect to Apple TV with a technology called AirPlay. iPhones and iPads have a Screen Mirroring button in the Control Center for making a connection. To connect with AirPlay follow the instructions below:-
- To find the button on iPads and newer iPhones (the ones without home buttons) swipe down from the upper right-hand corner of the device; for older model iPhones and iPads swipe up from the bottom of the screen. This action opens the Control Center.
- Tap the Screen Mirroring button located in the third row down from the top on the left hand side.
- in the menu that opens on the iPad/iPhone select your room and enter the 4-digit code that appears on the TEC package’s screen.
-
-
Um, I connected my computer… where’s the picture?
Sometimes when a device is connected the TEC Package you see a blank desktop, even though on your screen you see your lesson all set up and ready to go. This is because there are ways that a computer can display onto multiple screens. Typically you will want to Mirror/Duplicate the desktop—i.e. show both things on the same screen. If you want to show different things on the two screens you will want to Extend the desktop. If see a blank desktop it is because your device is Extending the desktop. Switching back and forth between the two depends on whether you are using a Windows PC, Chromebook or Mac computer (iPads and iPhones will always mirror).
Switching Display Settings on Windows
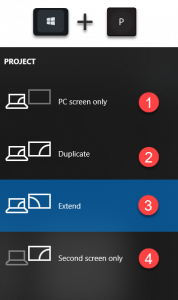 To change how a Windows device is displaying content press the “Windows Key” + “P” shortcut (P stands for Projector). When you do this you will be given four options:
-
- PC Screen only: Do not display anything on the projector.
- Duplicate: Also known as Mirroring. Show the same media on both screens.
- Extend: Show different images. This setting is typically used when multiple monitors are placed side-by-side.
- Second screen only: Don’t show anything on the laptop screen. Could be useful if the laptop is plugged in at the front to show a movie, and you don’t want the laptop’s screen lit up.
-


Switching Display Settings on Chromebooks
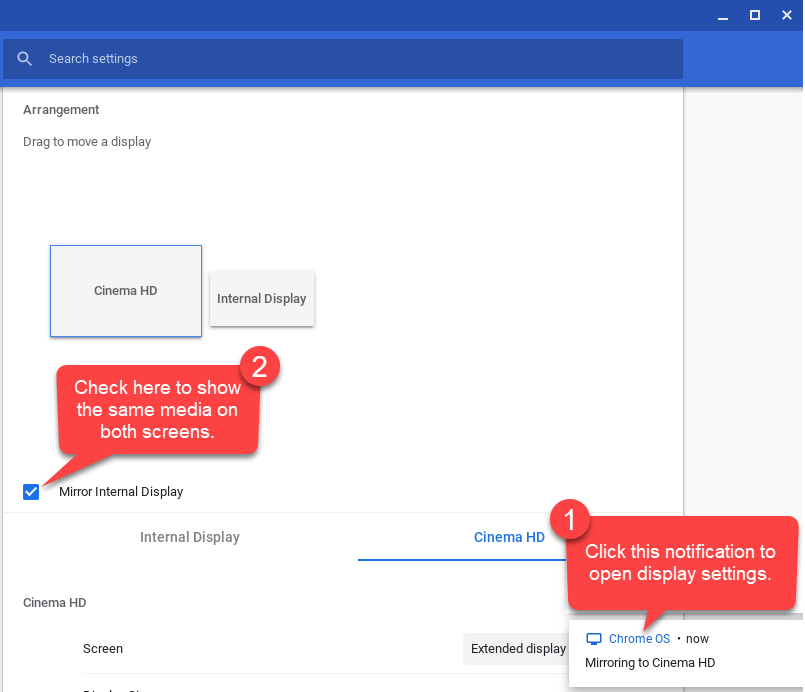 The easiest way to reach the Display settings on a Chromebook is to click on the notification box that appears in the lower right-hand corner of the screen when you make a new connection (1). When you are on the Display Settings page check the box that says Mirror Internal Display to show the same media on both screens (2).
If you don’t see the notification window when you plug in HDMI you can also find the display settings by following the instructions on the image below.

Click to Enlarge
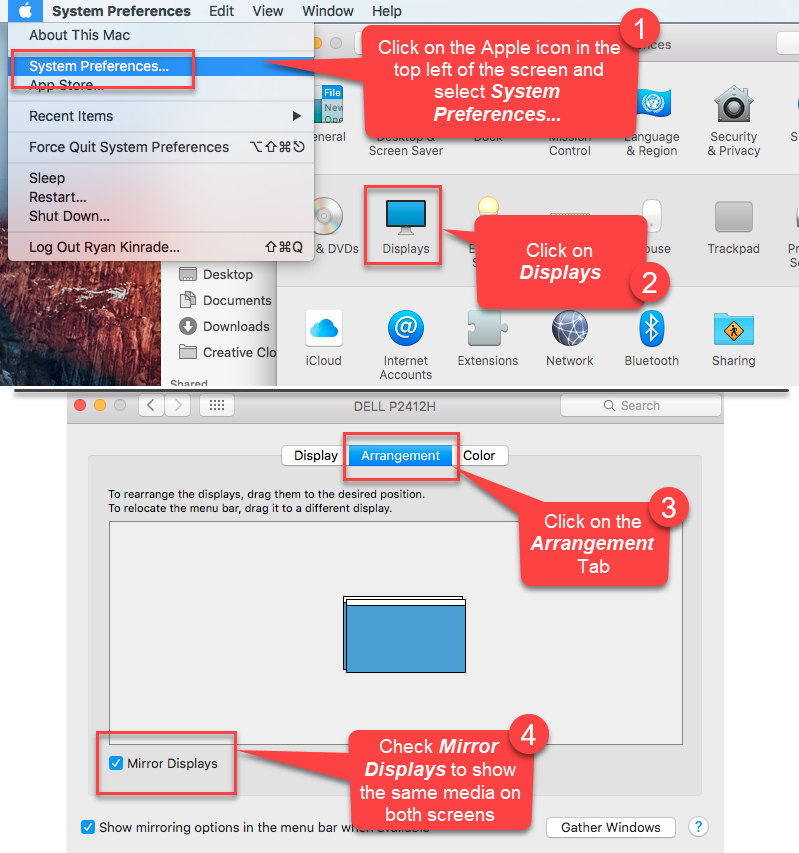
Switching Display Settings on a Mac
Open this image for instructions on accessing the display settings on a Mac.
Playing sound through the TEC Package with a blank screen
To play sound from any device with the projector off you will need to access the projector’s settings using the remote (or by touching buttons on the projector itself, which can get dicey if the projector is up high). The changes you make will be permanent, unless you change them back afterwards. To enable this feature do the following:
- Press the Menu button on the remote
- Scroll down to the ECO tab
- Scroll down to Standby Mode
- Switch the setting to Communication On
- Scroll up to the Extended Tab
- Scroll down to A/V Settings
- Change A/V input to Always On
You can now play music/audio from any computer iPad/iPhone or other source; just remember to select the correct source (Computer 1, HDMI 1 or HDMI 2/Apple TV).